I have always been fascinated by the idea of learning objects and adaptive learning systems. This interest is partially selfish - as a learner I rebel against training materials that force me to click through every single thing on every single slide, without letting me skip anything that I might not need, or already know.
For this week's ELH Challenge, I decided to approach the topic of checklists from my favorite perspective of adaptability. In my concept demo, I am assuming an e-learning module with three chapters. I included three questions, which represent a pre-test on the training content. Based on the results of each asessment, the module chapters are shown as "mastered", "suggested for review" or highlighted as "focus points" for learning.
In this post I will explain how the concept was created in the Storyline 2. However, the biggest challenge of this concept (assuming you would like to flesh it out) is not the development of the list, but the instructional design. Mostly because you will need to create a good assessment that will actually measure the learner's knowledge of the subject matter. Note that you will need to have as many sets of questions as you will have chapters in your e-learning.
I will assume that you are not aiming to report the results of this pre-assessment to the LMS or otherwise track it, as it's not an intended purpose of this interaction.
The former will give you more control, the latter will save time.
If you wish to draw questions randomly, divide them into questions banks (one bank per chapter) and add random draws from question banks to your project. It is interesting to note that you can add any slide to the question bank. You don't have to use the built-in question slides or freeform interactions.
If you're not using your own variables, you will also need to create a separate scene and add three blank results slides - one slide per each set of questions. Essentially, you're aiming for this:

It doesn't matter how your slide results look, since they will not be visited by learners - this is the reason they are in a separate scene. The only reason we need them is to have the quiz result variables. Specifically, we'll be interested in ResultsX.ScorePercent or ResultsX.ScorePoints - depending on whether you want to use percentage or points for the final scoring.
You will notice that self-ticking checkboxes are animated. To recreate this, first, create three separate objects: a "Normal" checkbox, a "Filled" checkbox, and a Check Mark. Note that I used a regular shape rather than a button.
Create a custom state for "Normal" checkbox - let's call it "Checked".
Add desired animations to the "Filled" checkbox and the Check Mark. Select both of these objects, cut (Ctrl+X) and paste them into the "Checked" state of the "Normal" checkbox. In other words, you'll have three objects inside an object:
Don't forget to create three custom states to signal the chapter status, for example:
I used "Shape" animation for the filled checkbox, "Grow" for the check mark, and "Wipe" for the chapter status labels. I do recommend using animations for elements that need to turn from invisible into one of several possible states (such as chapter status labels in this example). Otherwise before changing to the custom state, they will flicker the "Normal" state for a second. Adding even a tiny bit of "Fade" solves this issue. Of course, you can try to create a "normal" state that is invisible, but consider animations, too.
Create the rest of the objects and adjust their positions on the timeline, as you wish. In my example, I have arranged everything as follows:
To save time, I would recommend creating the elements for the first chapter "card", add animations, timeline positions, etc. Then group the elements and copy/paste the group as many times as you have chapters. This way you will keep all properties and timeline positions of all the elements within a group - no need to adjust each of the elements over and over.
This is the way I created the "spinner" on the "Processing results" slide: I created and timed a group of 4 circles, grouped them and pasted the group several times on top of itself.
You're done!

While I haven't tested this concept on an LMS, I haven't had any issues with the menu items changing states with the described setup when viewing the published output online. As I mentioned before, the ability to report these results was not intended for this interaction, but if you need to report these results, feel free to experiment with the results slides or any other workarounds and let me know what you find out.
For this week's ELH Challenge, I decided to approach the topic of checklists from my favorite perspective of adaptability. In my concept demo, I am assuming an e-learning module with three chapters. I included three questions, which represent a pre-test on the training content. Based on the results of each asessment, the module chapters are shown as "mastered", "suggested for review" or highlighted as "focus points" for learning.
 |
| Animated menu |
In this post I will explain how the concept was created in the Storyline 2. However, the biggest challenge of this concept (assuming you would like to flesh it out) is not the development of the list, but the instructional design. Mostly because you will need to create a good assessment that will actually measure the learner's knowledge of the subject matter. Note that you will need to have as many sets of questions as you will have chapters in your e-learning.
I will assume that you are not aiming to report the results of this pre-assessment to the LMS or otherwise track it, as it's not an intended purpose of this interaction.
Creating Assessment
There are two ways to implement the assessment:- do everything manually and use variables
- use the question slides.
The former will give you more control, the latter will save time.
If you wish to draw questions randomly, divide them into questions banks (one bank per chapter) and add random draws from question banks to your project. It is interesting to note that you can add any slide to the question bank. You don't have to use the built-in question slides or freeform interactions.
If you're not using your own variables, you will also need to create a separate scene and add three blank results slides - one slide per each set of questions. Essentially, you're aiming for this:
It doesn't matter how your slide results look, since they will not be visited by learners - this is the reason they are in a separate scene. The only reason we need them is to have the quiz result variables. Specifically, we'll be interested in ResultsX.ScorePercent or ResultsX.ScorePoints - depending on whether you want to use percentage or points for the final scoring.
Creating the Menu
Fancy Checkboxes
Create a custom state for "Normal" checkbox - let's call it "Checked".
Add desired animations to the "Filled" checkbox and the Check Mark. Select both of these objects, cut (Ctrl+X) and paste them into the "Checked" state of the "Normal" checkbox. In other words, you'll have three objects inside an object:
 |
| Check box state using two additional objects. |
Don't forget to create three custom states to signal the chapter status, for example:
 |
| Custom states of the "Chapter status" label |
I used "Shape" animation for the filled checkbox, "Grow" for the check mark, and "Wipe" for the chapter status labels. I do recommend using animations for elements that need to turn from invisible into one of several possible states (such as chapter status labels in this example). Otherwise before changing to the custom state, they will flicker the "Normal" state for a second. Adding even a tiny bit of "Fade" solves this issue. Of course, you can try to create a "normal" state that is invisible, but consider animations, too.
Create the rest of the objects and adjust their positions on the timeline, as you wish. In my example, I have arranged everything as follows:
 |
| The elements of one chapter (title, background, status, checkbox) are grouped together and arranged on the timeline. The group is then copied to preserve the timings. |
To save time, I would recommend creating the elements for the first chapter "card", add animations, timeline positions, etc. Then group the elements and copy/paste the group as many times as you have chapters. This way you will keep all properties and timeline positions of all the elements within a group - no need to adjust each of the elements over and over.
This is the way I created the "spinner" on the "Processing results" slide: I created and timed a group of 4 circles, grouped them and pasted the group several times on top of itself.
Triggers
Finally, create the triggers to change the states of checkboxes and chapter status labels, based on the assessment results. For example: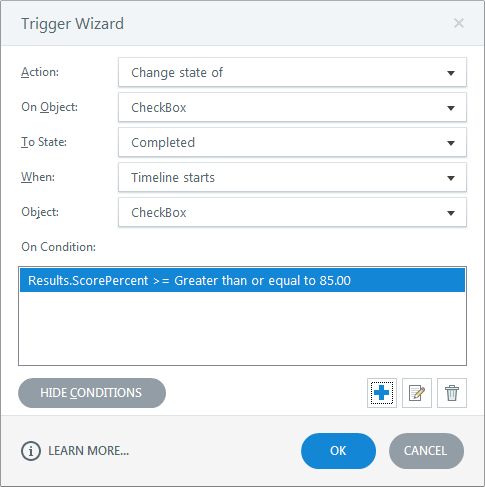 |
| The checkbox will be set to status "Completed" if the learner scores 85% or more on the first assessment. |
Not Visiting Results Slides?
Yes, you don't actually have to visit the results slide to generate the quiz results. You can, if you like, create a "Loading screen" slide and add the "Submit quiz results" trigger to it (it will work for more than one assessment):While I haven't tested this concept on an LMS, I haven't had any issues with the menu items changing states with the described setup when viewing the published output online. As I mentioned before, the ability to report these results was not intended for this interaction, but if you need to report these results, feel free to experiment with the results slides or any other workarounds and let me know what you find out.


No comments:
Post a Comment